Welcome to our kitchen tile makeover journey, where I’m showing you how to paint backsplash! Our home, built in the 1970s, had some outdated features that needed a little love. We wanted to preserve its unique charm while giving it a fresh and modern look. One cost-effective solution we discovered was painting our kitchen tile backsplash using tub and tile paint. The transformation was incredible, and we can’t wait to share our experience with you. Let’s dive into the step-by-step guide on how to paint a backsplash and achieve stunning results without breaking the bank!

Supplies
Before you embark on this fun DIY project, it’s essential to gather all the necessary supplies. Here’s everything we used for this easy project:
- Tub and Tile Paint: Look for a quality paint specifically designed for ceramic and porcelain surfaces, available in a variety of colors to match your kitchen’s theme.
- Paintbrushes and Rollers: Opt for high-quality brushes and rollers suitable for smooth surfaces to ensure an even application.
- Painter’s Tape: This will be your best friend when it comes to creating crisp, clean lines around the edges of your backsplash.
- Sandpaper: Choose a fine-grit sandpaper to roughen the tile surface slightly, promoting better paint adhesion.
- Degreaser or TSP (Murphy’s Oil): To thoroughly clean the tiles before painting, removing any grease or grime that may interfere with the paint’s bonding.
- Drop Cloths: Protect your countertops and floors from accidental spills and splatters.
- Cleaning Cloths: Have a bunch of lint-free cloths on hand for wiping down surfaces during the prep and painting stages.
- Protective Gear: Don’t forget to wear gloves and a mask to protect yourself during the process.
Now that we have our supplies ready, it’s time to get our hands dirty and start prepping those tiles!
Step 1: Preparing the Backsplash
Cleaning the Tiles
To achieve a long-lasting and beautiful result, cleaning the tiles thoroughly is crucial. Use a degreaser or trisodium phosphate (TSP) like Murphy’s oil to get rid of any grease, grime, or residue. This step ensures the paint adheres well to the surface, providing a smooth and even finish.
Sanding the Tiles
Next, use a fine-grit sandpaper and gently roughen up the tile surface. This step helps the paint bond better, increasing the longevity of your newly painted backsplash.
Protecting Surrounding Areas
Before diving into the painting process, take a few moments to protect the surrounding areas. Use painter’s tape to cover the edges of your countertop and any other adjacent surfaces that you want to keep paint-free.
Step 2: Applying the Tile Paint
Mixing
In order to create a porcelain-like finish, our preferred tub and tile paint contained a part A compound and part B hardener required to be mixed together to form a chemical reaction.
Let the Painting Begin!
Now comes the exciting part—painting your backsplash! Use a high-quality brush or roller designed for smooth surfaces. Begin with a light coat of paint, working in small sections. Remember, it’s better to apply multiple thin coats than one thick coat, as it prevents drips and ensures an even finish.
The Power of Patience
Allow each coat of paint to dry completely for at least two hours before applying the next one. Patience is key to achieving a flawless painted backsplash, so resist the temptation to rush through this step.
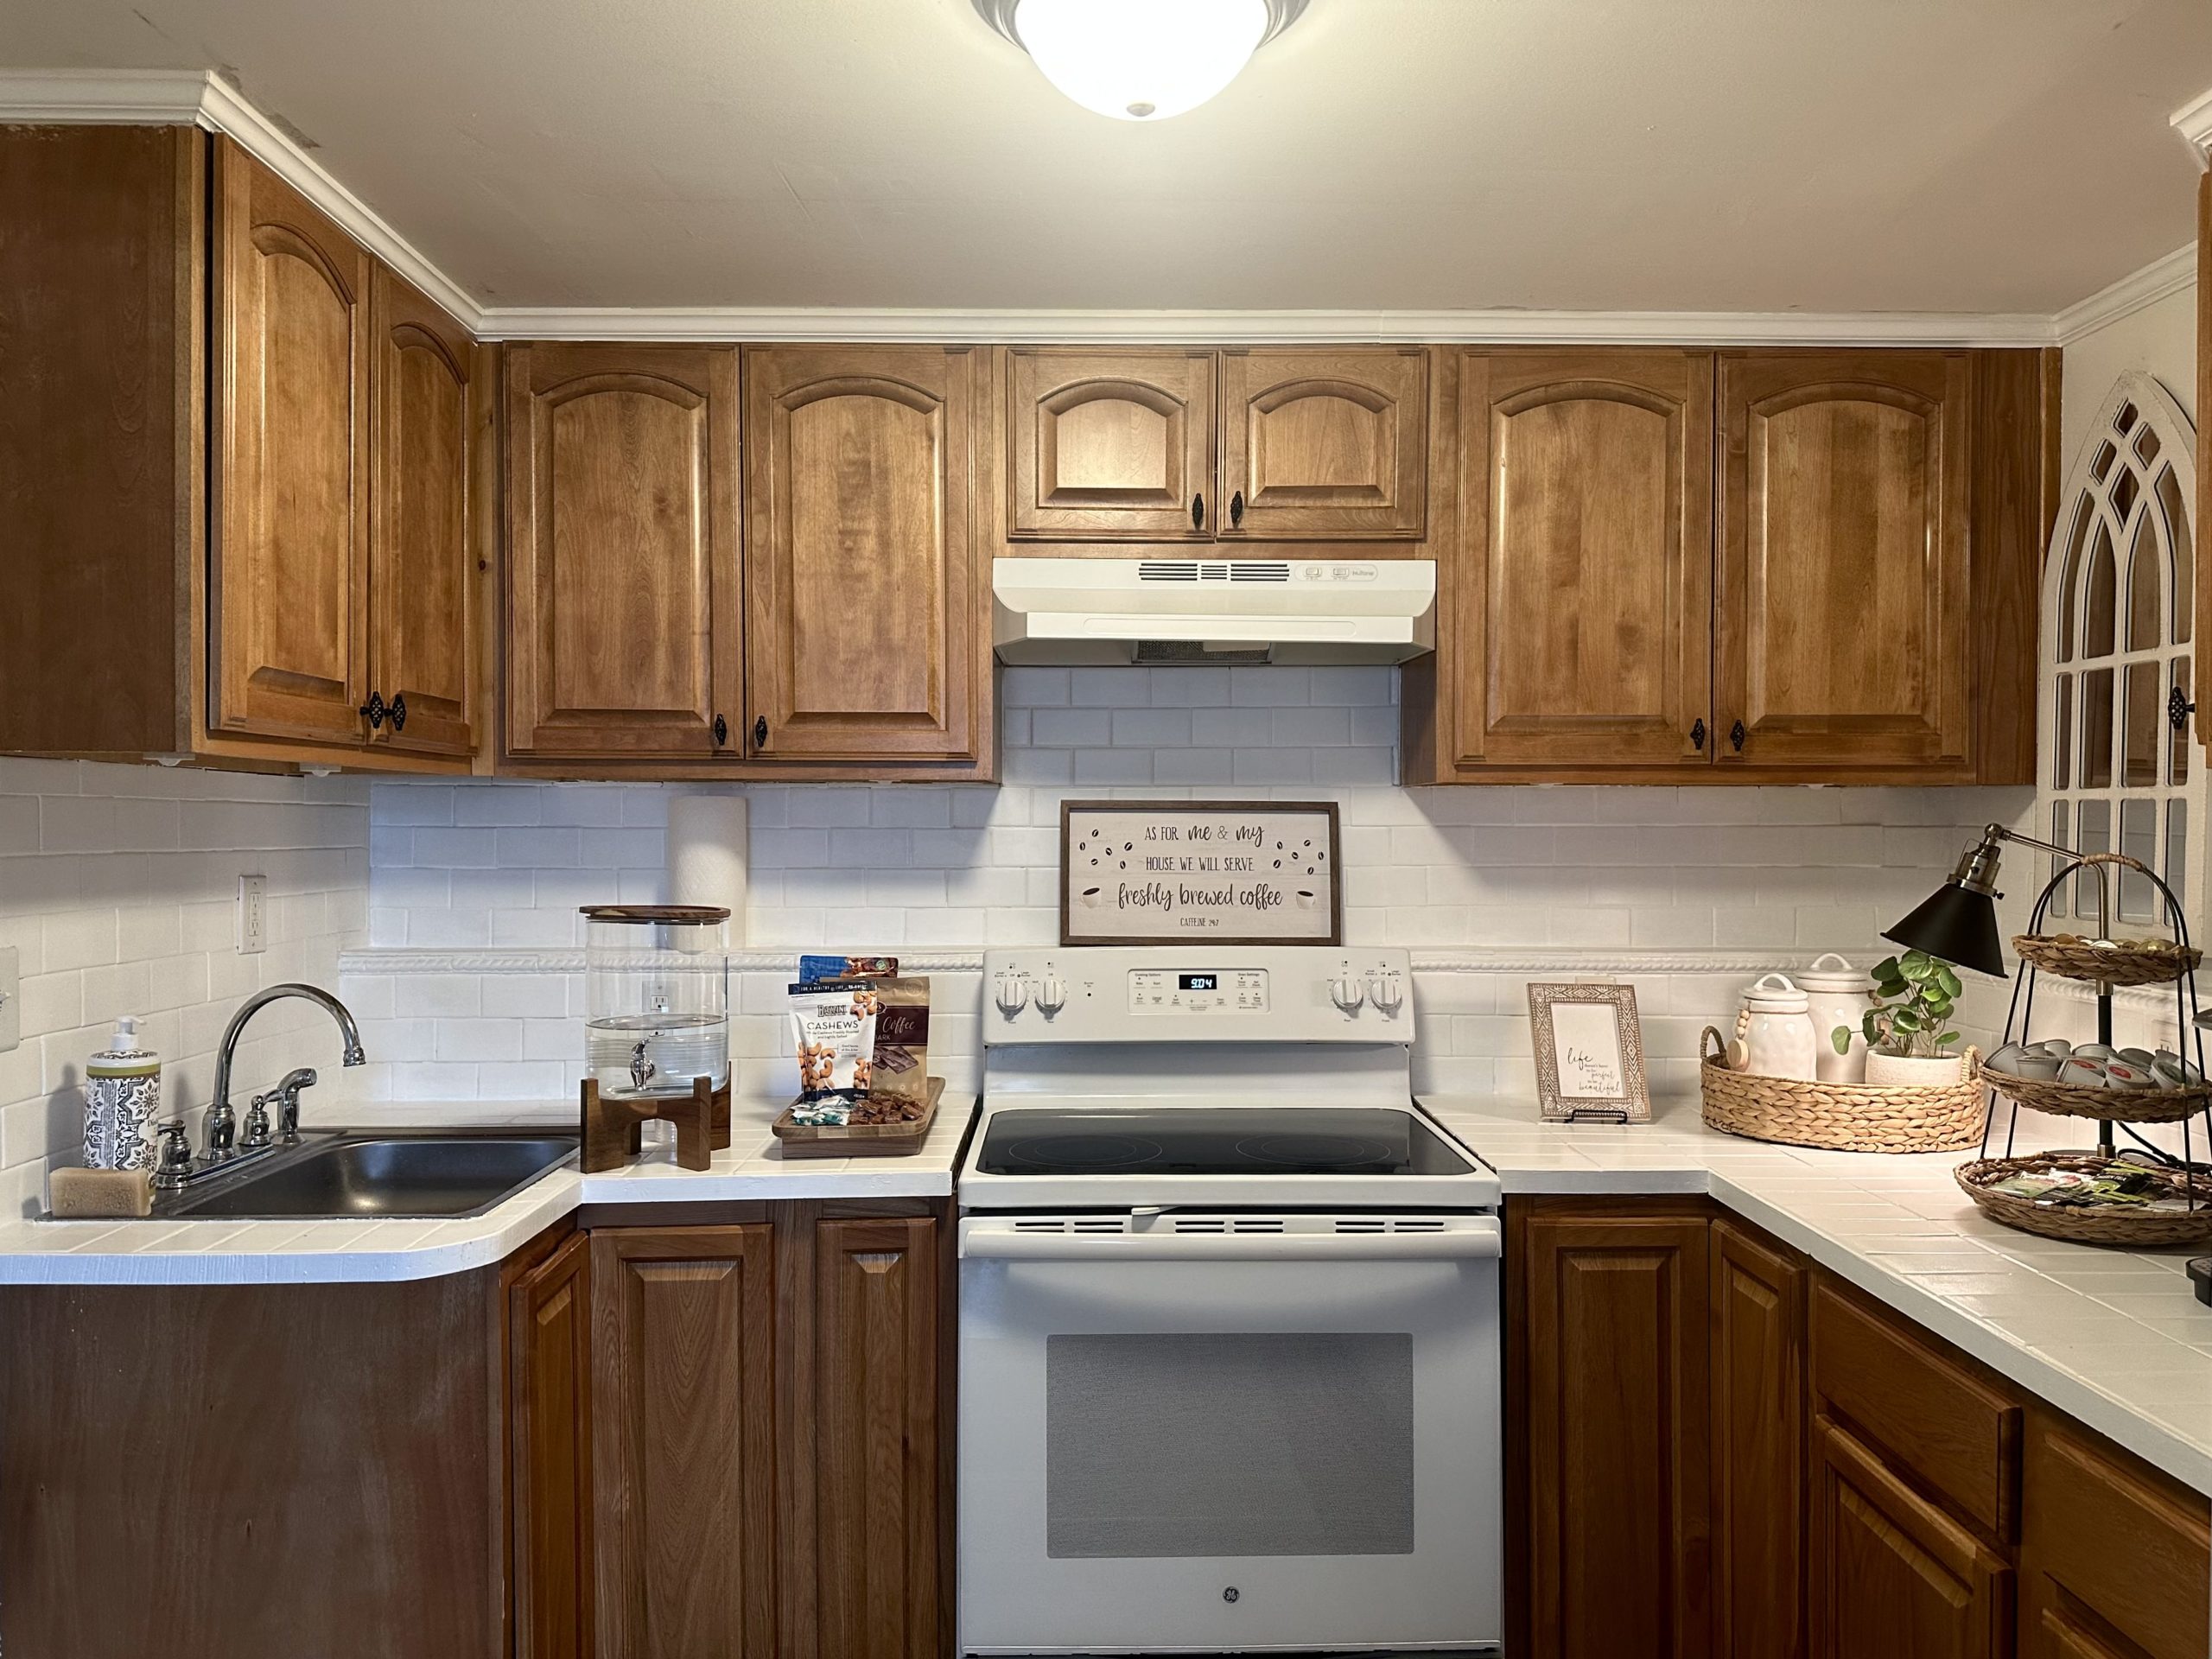
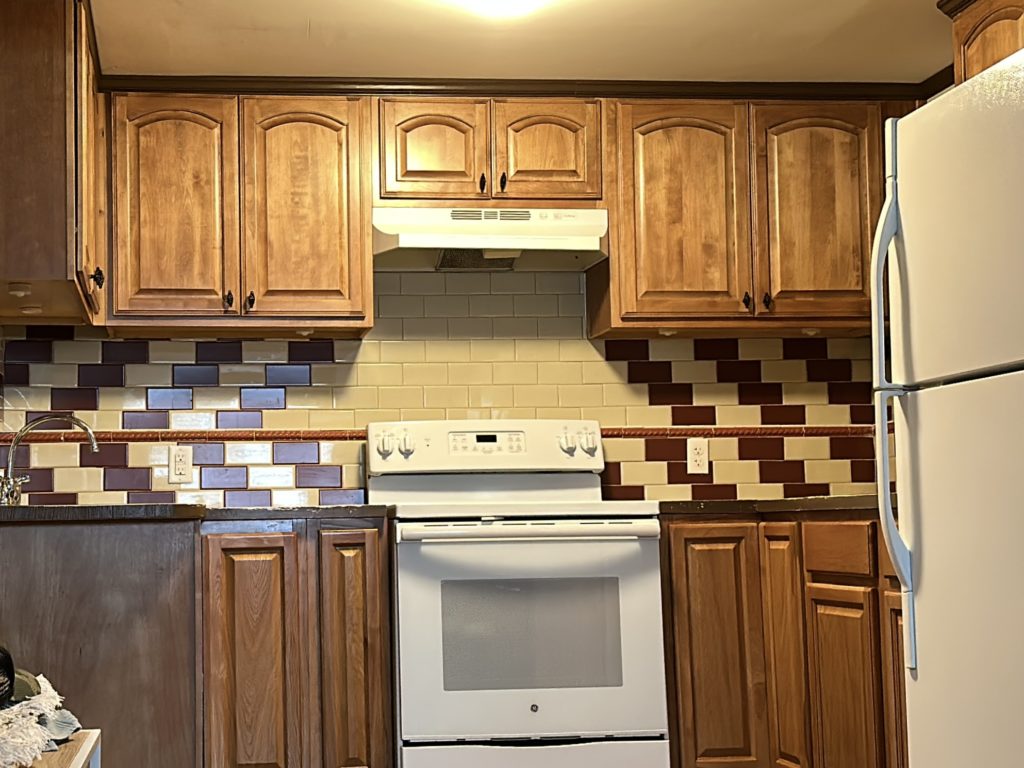
Step 3: The Big Reveal – Before and After!
With all the hard work behind us, it’s time for the grand reveal. Step back and take a moment to admire your freshly painted kitchen tile backsplash! The transformation is simply astounding, and you’ve successfully updated your kitchen without the need for expensive renovations.
Maintenance Tips for Longevity
Now that you’ve accomplished this fantastic kitchen update, let’s talk about some essential maintenance tips to keep your painted backsplash looking fabulous for years to come:
- Gentle Cleaning: Use a mild, non-abrasive cleaner and a soft cloth to clean your painted tiles regularly. Avoid harsh chemicals that may damage the paint finish.
- Avoid Scratching: While tub and tile paint provides a durable finish, it’s best to avoid using abrasive scrubbers that may scratch the surface.
- Be Mindful of Hot Items: Although the paint is heat-resistant, it’s best to avoid placing hot pots and pans directly on the painted surface. Use trivets or hot pads to protect the paint from extreme heat.
- Touch-Up as Needed: Over time, your painted backsplash may experience wear and tear. Keep some extra paint on hand to touch up any chips or scratches that may occur.
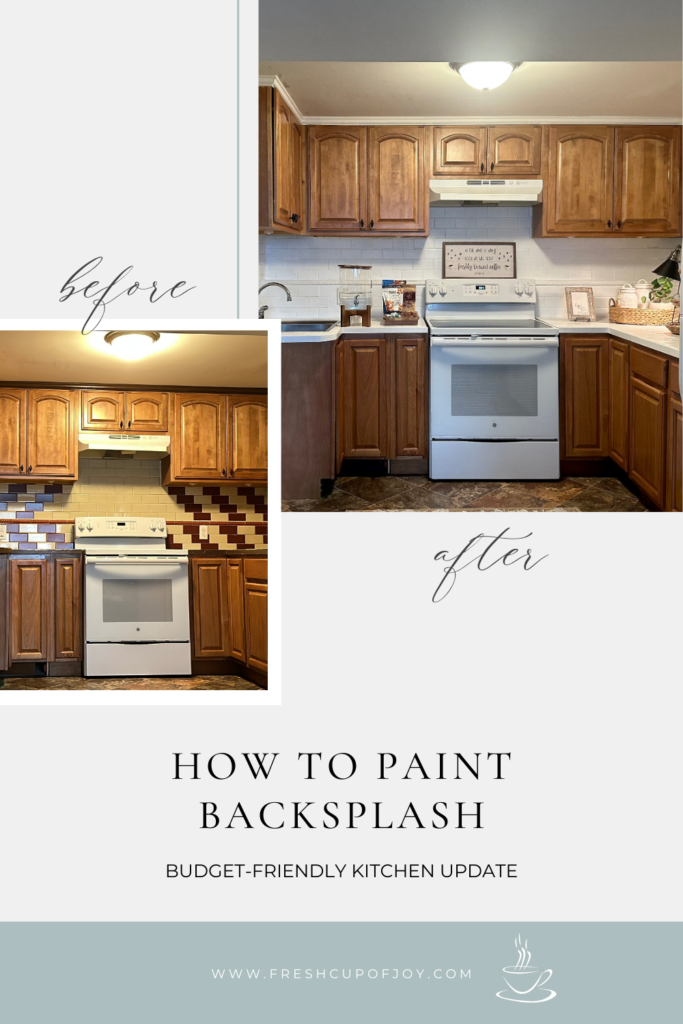
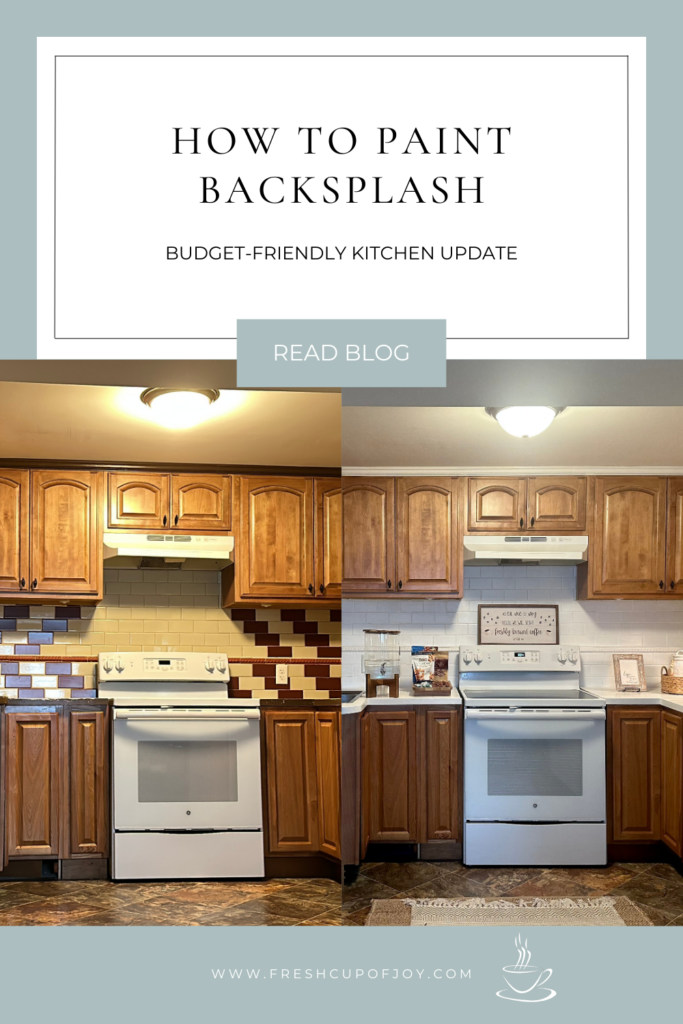
There you have it—a budget-friendly and creative way to update your kitchen tile backsplash! With a little bit of effort, tub and tile paint, and some love, you’ve preserved the unique features of your 1970s home while giving it a fresh and modern twist.
Through the magic of paint, you’ve elevated your kitchen’s aesthetics and created a space that you’ll love to cook and entertain in. Don’t forget to take plenty of before and after photos to document your incredible transformation!
Remember, DIY projects like this are not only rewarding but also a great opportunity to add your personal touch to your home. So, gather your supplies, put on your creative hat, and embark on your own tile painting adventure. Happy painting!
For more DIY projects, visit https://freshcupofjoy.com/category/home/design/!